
It all started with a pink little sponge, which promised to make your makeup look flawless and beautiful. This little miracle which changed the beauty industry was called beautyblender. It changed the way most of the makeup lovers apply their base makeup. From brush to a small sponge. When time passed many other companies brought different kinds of beauty sponges to the market. Different shapes, different prices, but all share the same idea for the use. Of course when time passed people invented more usefully ways to use the sponges than just for the foundation. Today I’m going to show you different ways to use a beauty sponge! I also show and review two beauty sponges from pastelbeauty.fi (pr-samples) that are more affordable than the original beautyblender <3
Kaikki alkoi pienestä pinkistä sienestä, joka lupasi saada meikkisi näyttämään kauniilta ja luonnolliselta. Tämä pieni ihme, joka muutti koko kauneusalan, oli nimeltään beautyblender. Se muutti monen meikkaamista rakastavan ihmisen pohjameikin levitystavan. Meikkisivellin vaihtui pieneen sieneen. Aina tuosta päivästä lähtien monet yritykset ovat tuoneet markkinoille erilaisia meikkisieniä. Erimuotoisia ja erilaisilla hinnoilla, joista jokainen kuitenkin jakaa samanlaisen käyttötarkoituksen. Ajan kuluessa meikkien rakastajat kehittivät mitä kekseliäimpiä tapoja käyttää näitä meikkisieniä meikkivoiteen levityksen lisäksi. Tänään aionkin kertoa teille noita eri tapoja käyttää meikkisieniä tai suomalaisittain meikkimunia! Tulen myös näyttämään ja vertailemaan teille kahta pastelbeauty.fistä saamaani meikkisientä (pr-näytteitä), jotka ovat hinnaltaan edullisempia kuin alkuperäinen beautyblender <3

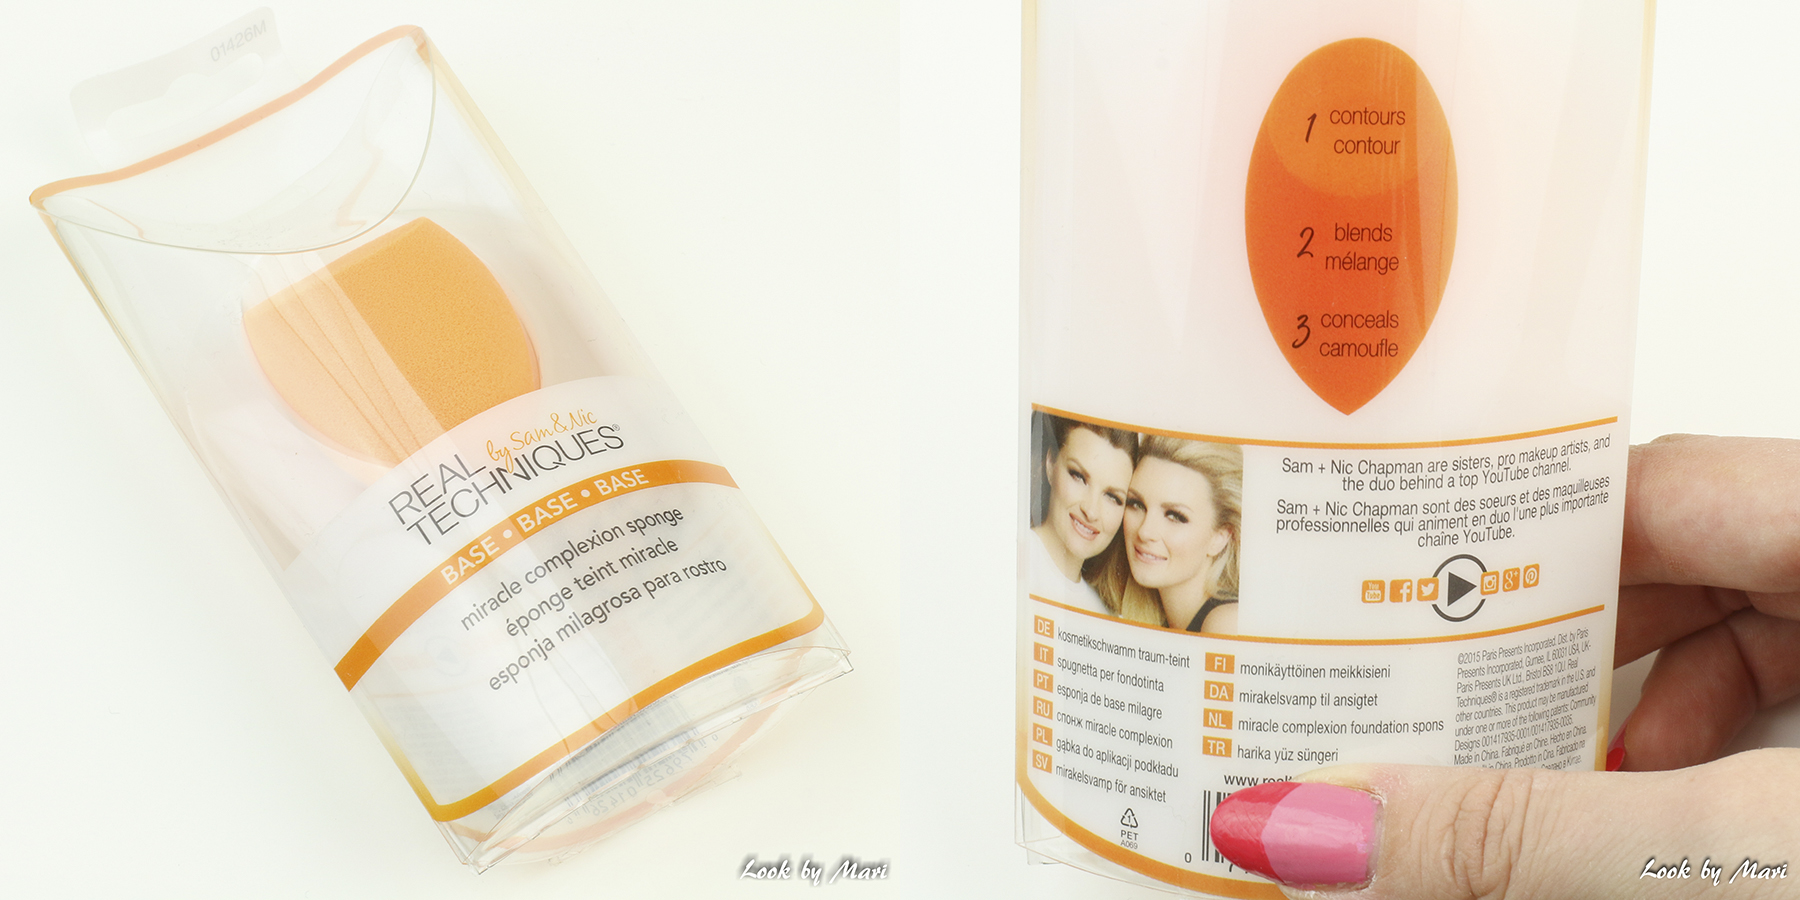
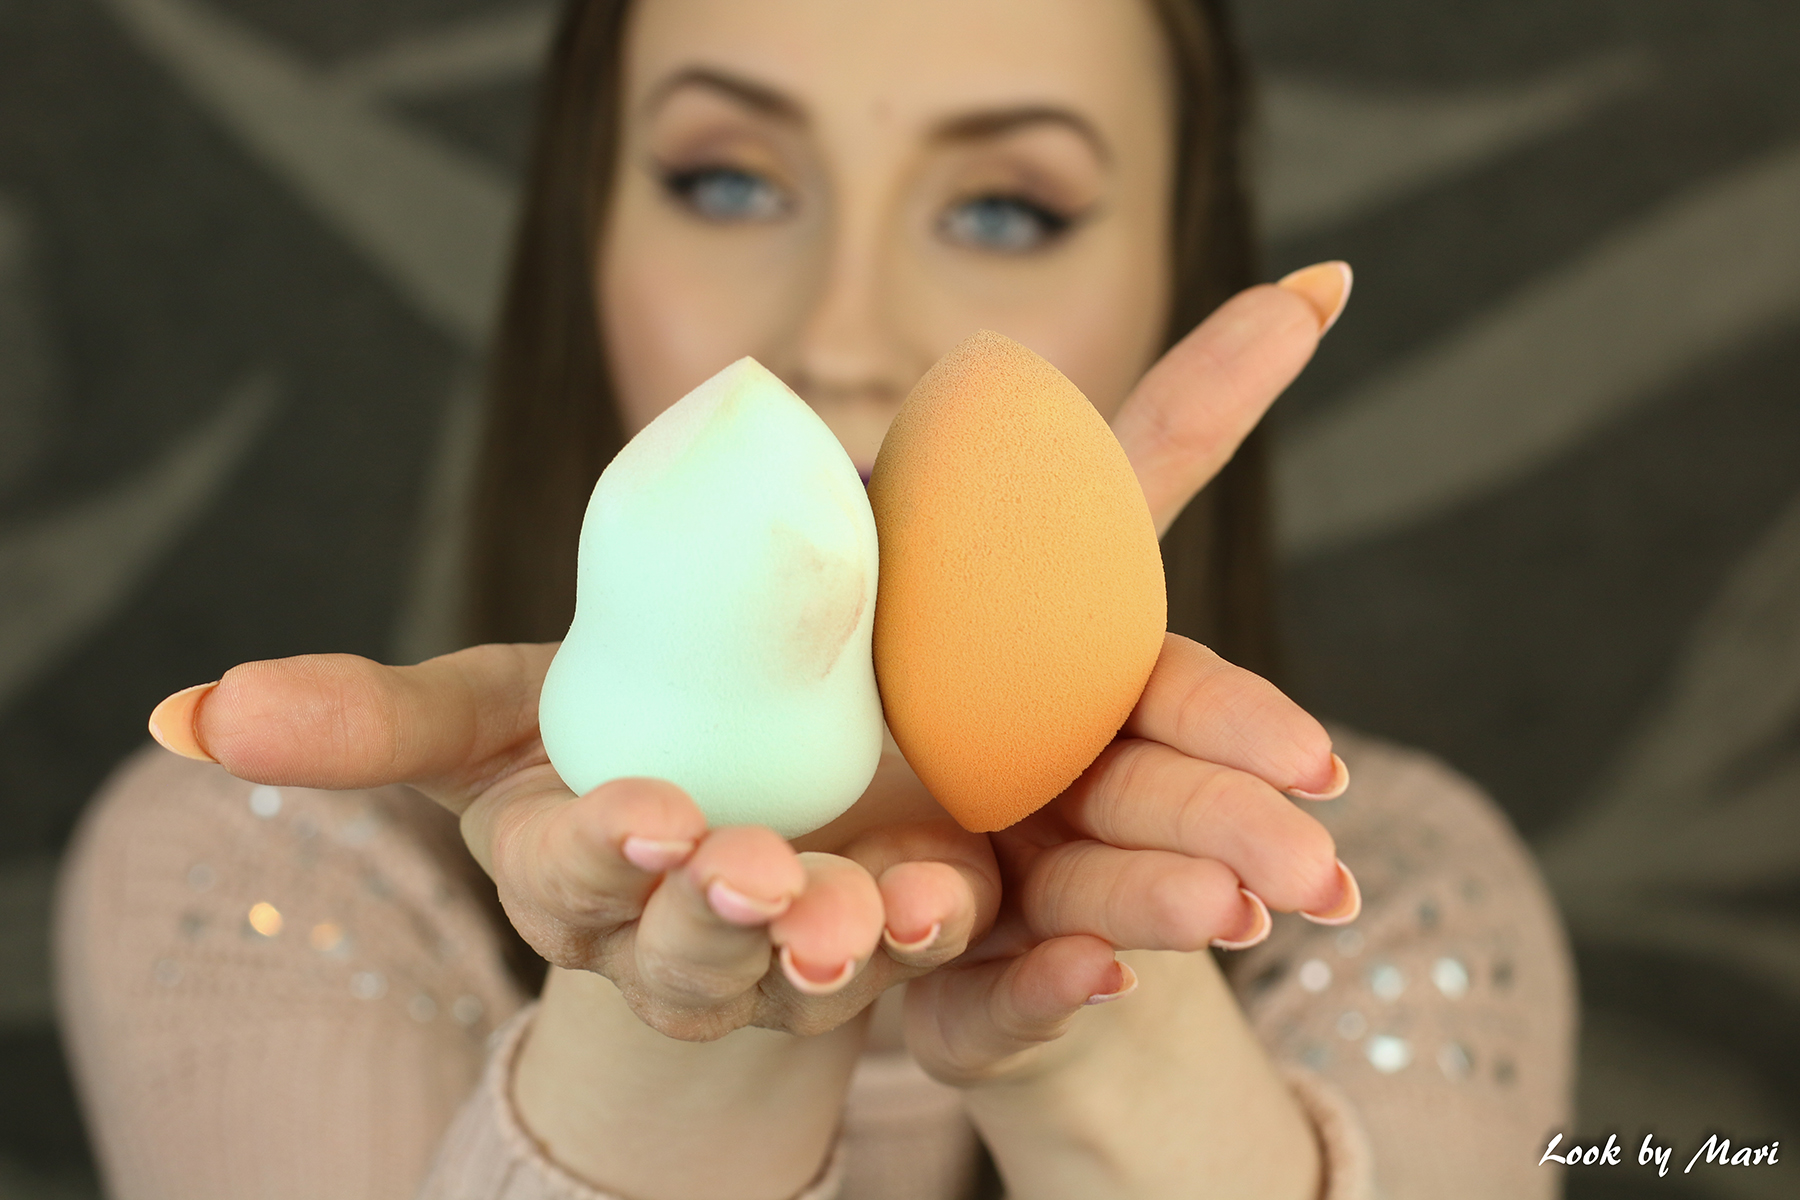
The first beauty sponge I’m going to use is Real Techniques miracle complexion sponge, which cost around 10 euros. You can also get this in two-pack for 15.90 euros and I have even seen these in 4-packs. The package says there is three different sides to the sponge to use for contouring, blending the foundation and for concealing.
Ensimmäinen meikkisieni, jota aion tänään käyttää, on Real Techniquesin miracle complexion sponge, joka maksaa noin 10 euroa. Näitä on myös saatavilla tuplapakkauksissa hintaan 15.90 euroa ja olen jopa nähnyt näitä myynnissä neljän kappaleen paketeissa. Itse paketissa mainitaan kolme erilaista tapaa käyttää tätä sientä: varjostus, meikkivoiteen levitys ja peiteaineen häivytys.

The second beauty sponge I’m going to use is Nanshy’s marvel blender, which cost 8.99 euros. On the package there is only reference to using this for foundation. But I’m going to use this for lot more :)
Toinen meikkisieni, jota aion tänään käyttää, on Nanshyn marvel blender, joka maksaa 8.99 euroa. Paketissa viitataan vain yhteen käyttötapaan, joka on meikkivoiteen levitys. Aion ehdottomasti käyttää tätä tänään moneen muuhunkin käyttötarkoitukseen :)

This is the difference between the two sponges. Nanshy’s one is more pointed and it has a round bottom as the Real Techniques one has a flat bottom. Below you can see from left to right: original beautyblender, Real Techniques miracle complexion sponge and Nanshy’s marvel blender. As you can see the beautyblender is slightly smaller in size than the other two and also a really simplified version.
Tällaiset ovat näiden kahden meikkisienen erot. Nanshyn meikkisieni on enemmän suippo ja siinä on pyöreä pohja, kun taas Real Techniquesin meikkisienessä on tasainen sivu pohjana. Alta näet kuvan, jossa ovat vasemmalta oikealle: original beautyblender, Real Techniques miracle complexion sponge ja Nanshyn marvel blender. Kuten näet kuvasta on beautyblender kooltaan vähän pienempi ja muotoilultaan todella simppeli.

So before you start to do anything with beauty sponges, you need to know three things :)
1. Firstly, when using a beauty sponge, you want to dampen the sponge by holding it under a running cold water and squeezing it 15-20 times until it larges in size and gets softer. I like to squeeze the sponge at least 15 times under the water and then it works the best. After that you want to gently squeeze the excess water off and then gently squeeze the sponge between a towel to get it less dampen.
2. When using a beauty sponge, you only want to use tapping motions! No dragging, swiping or circular motions. Only tap tap tap tap tap and more tapping :) If you’re unsure how to properly blend with a beauty sponge, I recommend you to watch some Youtube videos about it :)
3. You have to wash beauty sponges after every use! I frequently see that people only wash their beauty sponges after a week of use (7 uses) or even after couple weeks of use. Because beauty sponges are used wet they build up even more bacteria in them than foundation brushes. And I don’t think you want that extra bacteria on your face to cause blemishes. So wash your beauty sponges and let them dry completely before next use.
But now let’s jump into the tutorial, where I show you all the different ways to use the beauty sponges :)
Ennen kun aloitan kertomaan mitään meikkisienten käytöstä, täytyy sun tietää kolme hyvin tärkeää asiaa :)
1. Ensimmäisenä sun tulisi tietää, että kun käytät meikkisientä, tulee se ensin kastella hyvin. Kastele sieni puristaen sitä vähintään 15-20 kertaa juoksevan veden alla, kunnes se kasvaa kooltaan ja tulee paljon pehmeämmäksi. Itse tykkään puristaa sientä ainakin sen 15 kertaa juoksevan veden alla, jolloin tuo sieni alkaa toimimaan parhaiten. Kastelun jälkeen purista sienestä kevyesti ylimääräiset vedet pois ja tämän jälkeen kuivaa sientä vielä vähän käsipyyhkeen välissä.
2. Toisena seikkana, muista aina käyttää meikkisienten kanssa vain taputtelevaa liikehdintää! Ei minkäänlaista vetämistä tai pyörittelyä. Vain tap tap tap tap tap ja lisää taputtelua :) Jos et ole ihan varma kuinka käyttää meikkisientä oikeaoppisesti, suosittelen, että katsot muutaman beautyblenderin käytön opastus videon Youtubesta :)
3. Meikkisienet tulee pestä jokaisen käyttökerran jälkeen! Näen niin usein sosiaalisessa mediassa ihmisten käyttävän samaa sientä likaisena putkeen viikon jos toisenkin. Koska meikkisieniä käytetään kosteina, ne keräävät paljon enemmän bakteereja kuin meikkivoidesiveltimet. Enkä usko, että haluat noita ekstra bakteereja sun iholle aiheuttamaan finnejä. Joten pese meikkisienesi ja anna niiden kuivua kokonaan aina ennen seuraavaa käyttöä.
Mutta nyt mennäänpäs jo siihen itse tutoriaaliin, jossa näytän teille millä kaikilla eri tavoilla voit käyttää meikkisieniä :)

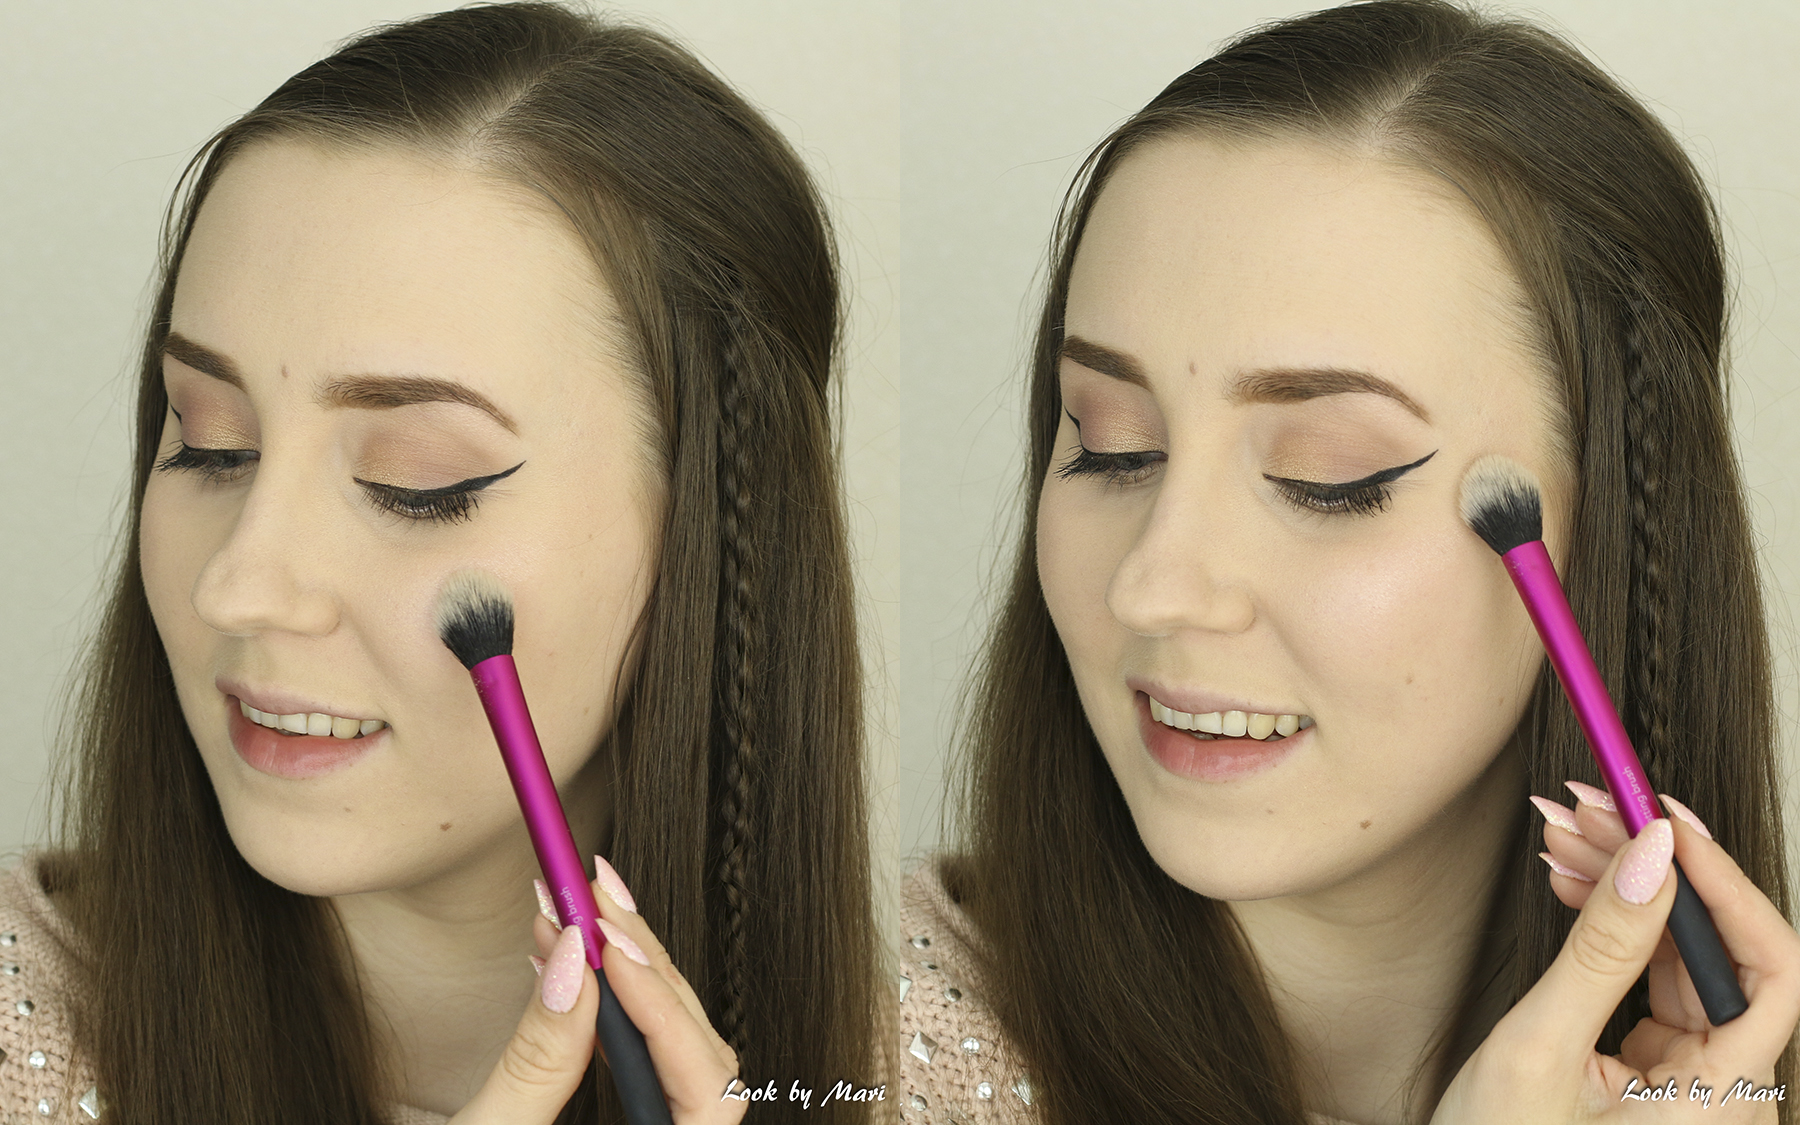
Beauty sponges are really popular to use for applying and blending foundation. You can dot the foundation onto your face with your fingers and then with the sponge and tapping motions blend it into the skin. You can also but the foundation straight to your sponge if you like. I personally like to blend the foundation with a brush or with my fingers first (depending on a foundation) and then slightly tap my face with a beauty sponge to get a smoother finish.
Couple things to consider when using a beauty sponge. A beauty sponge will absorb some of the foundation, so you will need more product, when using a beauty sponge. Also some foundation don’t go well with the damped sponges and they will start to go patchy or loose coverage. Also it depends on a sponge and a foundation compo, which does that and which won’t. More about that in a review part in the end of this post :)
Meikkisienten suosituin käyttötapa on meikkivoiteen levitys ja häivytys. Voit ensin sormella painella muutaman meikkivoide tipan ympäri kasvojasi ja sitten häivytellä sen sienellä taputellen. Voit myös laittaa meikkivoidetta suoraan meikkisienen päälle ja levittää sen siitä koko kasvoille. Henkilökohtaisesti mä tykkään levittää meikkivoiteen aina ensiksi iholle meikkisiveltimellä tai sormilla (riippuen meikkivoiteesta) ja sitten käydä meikkisienellä läpi koko kasvot saadakseni tasaisemman ja kauniimman lopputuloksen.
Huomioithan muutaman seikan ennen meikkisienen testaamista. Meikkisienet imevät enemmän meikkivoidetta kuin meikkivoidesiveltimet, joten tulet tarvitsemaan enemmän meikkivoidetta saman peittävyyden saamiseen. Jotkut meikkivoiteet eivät myöskään mene yhteen kostean meikkisienen kanssa, jolloin ne alkavat levittäessä levittymään läikikkäästi tai menettämään peittävyyttään. Nämä seikat voivat myös johtua epäsopivan sienen ja meikkivoiteen komposta, koska jotkut meikkivoiteet eivät vain toimi tiettyjen sienten kanssa. Mutta lisää tuosta postauksen lopussa olevasta arviointiosasta :)
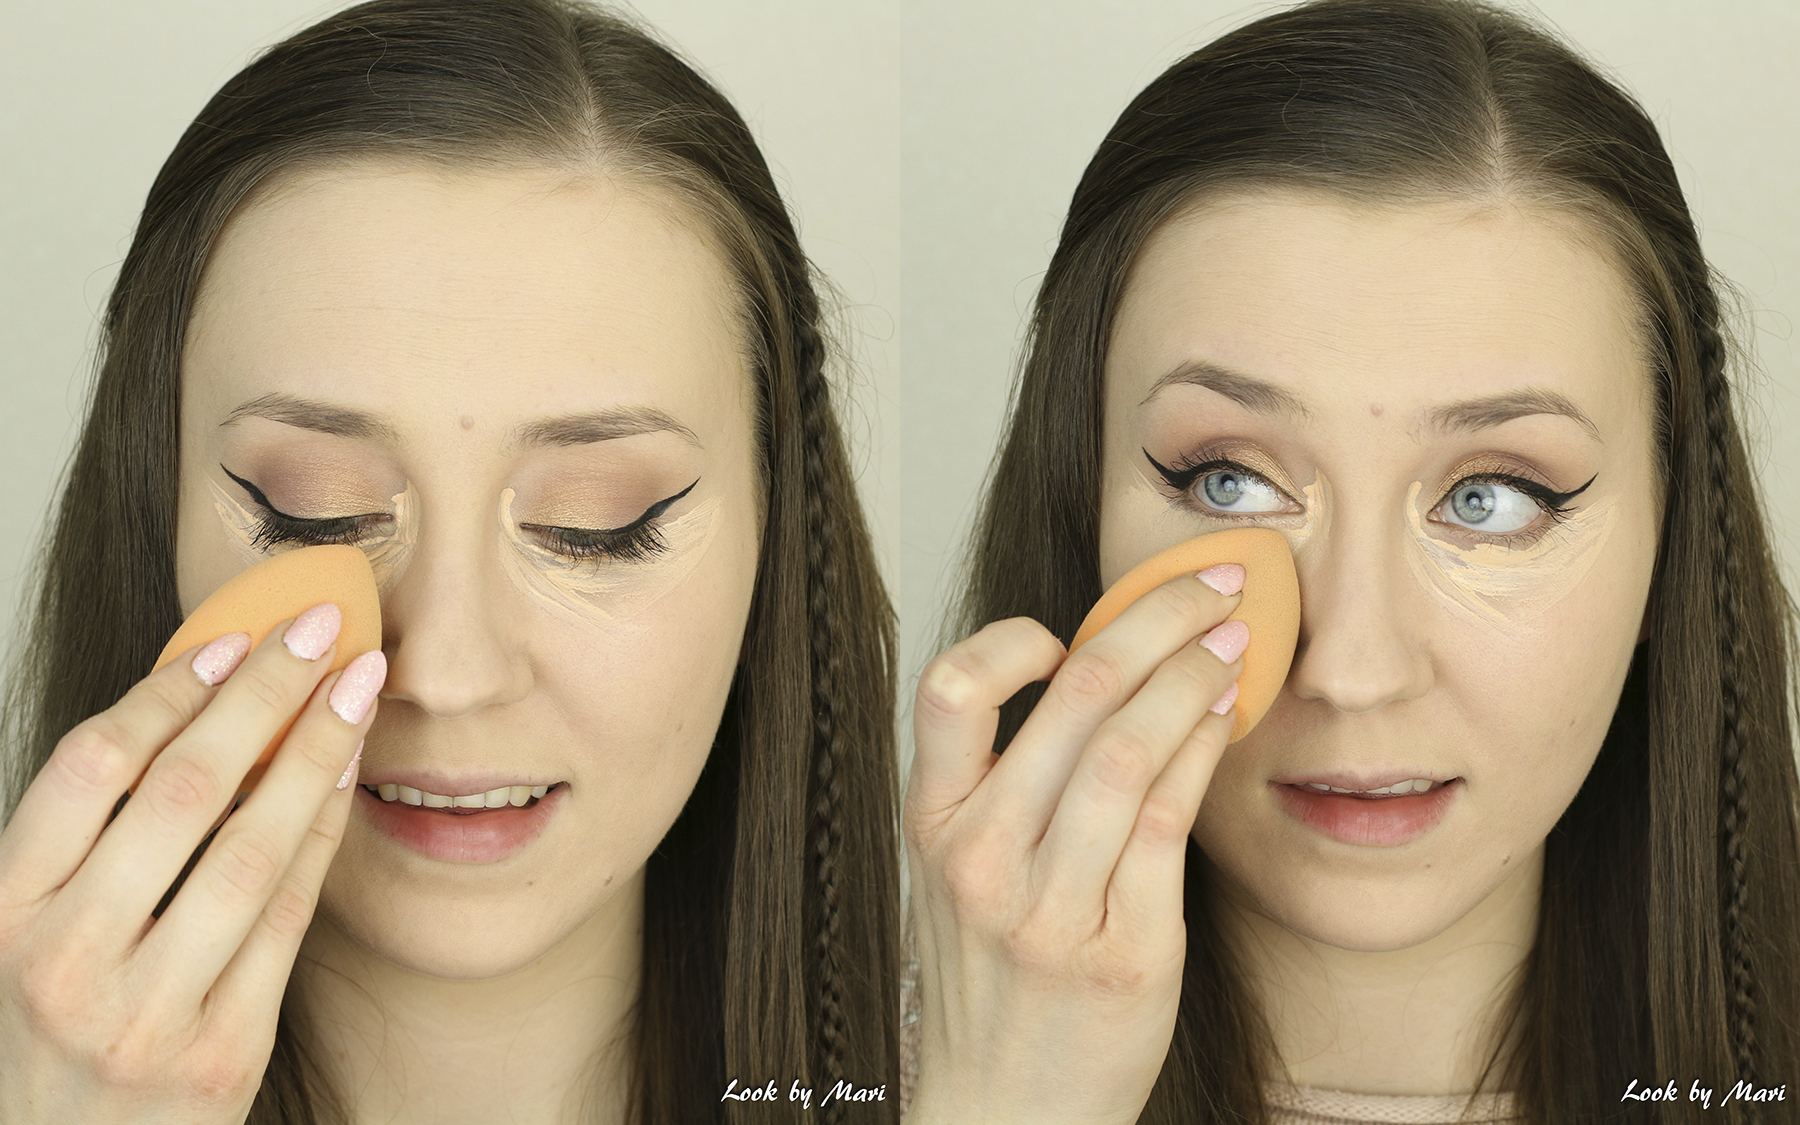
The second thing I use a beauty sponge every time I do my makeup is for concealer. Firstly I put the concealer under my eyes and then I start to tap it from the out of corners toward the inner corners. Because when your closing the fine lines backwards, the concealer blends smoothly, if you get what I’m trying to say :p Then just go back and forth and blend the concealer. Make sure not to over blend the concealer, because then it can start to loose coverage.
Toinen asia, johon käytän meikkisientä päivittäin, on peiteaineen levitys ja häivytys. Laitan ensin peiteaineen silmien alle ja sitten alan tasoittamaan sitä silmän ulkonurkista sisänurkkiin päin. Kun peiteainetta häivyttää tähän suuntaan eli silmien alla olevien ryppyjen vastakkaiseen suuntaan, levittyy peiteaine myös kauniisti niihin ryppyihin (jos ymmärrät mitä koitan tässä sepustaa :p) Tämän jälkeen voit vain taputella peiteainetta edes takaisin puolelta toiselle. Älä myöskään häivytä peiteainetta liikaa, koska silloin kostea sieni alkaa imeä liikaa peiteaineen peittävyyttä.
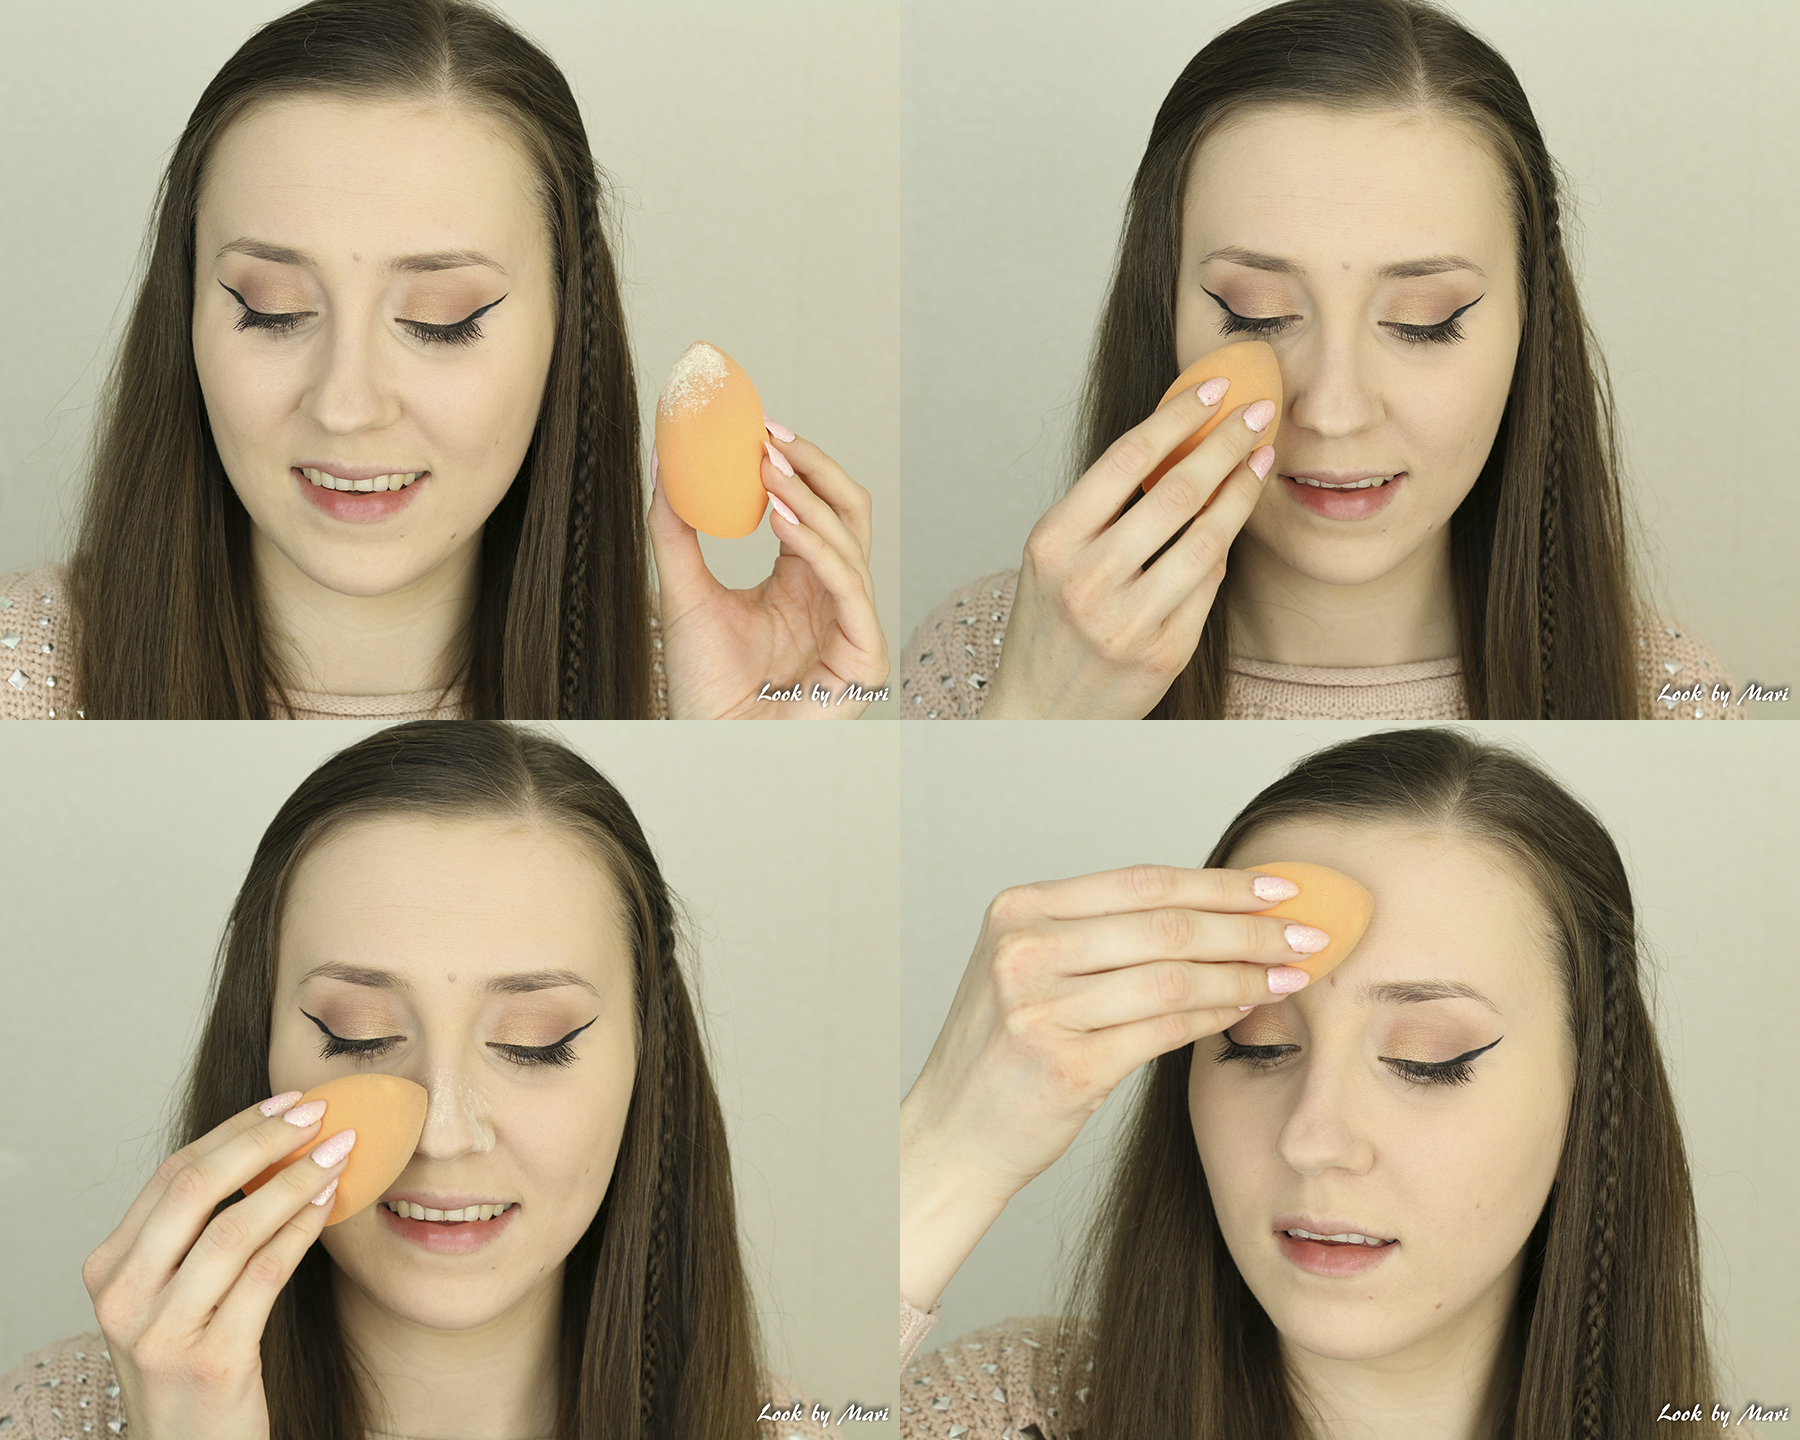
My favorite newest technique with beauty sponges is adding powder with a sponge! I use the same sponge I used with the foundation and the concealer (which is still little bit dampen) and take some powder on the tip of the sponge. Then I press it under my eyes, starting in the out of corners towards inner corners. You can also bake with this technique, when you just use way more powder and let it set under the eyes for 5-10 minutes. I normally just press a little bit of that powder under my eyes and don’t bake, because my under eyes are dry. You want to do the setting right after you have blended the concealer to prevent your concealer from creasing.
I also like to add powder to the parts of my face, which get oily throughout the day with a beauty sponge, because this magically helps with the oiliness! Also a kind a new trick I have learned along the way. This doesn’t make your face dry, it actually makes it the other opposite, but it somehow keeps the face matter when the time pasts. You can do this to your whole face or just for some parts and add the rest with a brush. But the secret is to add a little bit of the powder with pressing motions!
Mun uusin oppimani tekniikka liittyy puuterin levittämiseen sienellä! Käytän edelleen tuota samaa sientä, jota käytin meikkivoiteen ja peiteaineen kanssa (joka on noista vaiheista edelleen inan kostea) ja otan vähän puuteria meikkisienen kärkeen. Sitten painelen pieniä määriä puuteria silmieni alle aloittaen ulkonurkista kohti sisänurkkia. Voit halutessasi myös ”leipoa” silmien alta käyttämällä runsaasti puuteria silmien alle ja jättämällä sen hautumaan 5-10 minuutiksi. Itse en normaalisti ”leivo” silmienalusia, koska ne ovat mulla jo muutenkin hyvin kuivat. Muista kiinnittää silmien alla oleva peiteaine piakkoin sen häivyttämisestä, jotta silmien alla oleva meikki ei ala sulamaan ja erottumaan.
Tykkään myös levittää puuteria hieman kostean meikkisienen kanssa niille alueille, jotka alkavat mulla kiiltää päivän aikana. Tämä maagisesti hidastaa ihon kiiltelyä päivän aikana! Myöskin aika uusi kikka kolmonen, jonka olen oppinut. Tämä ei tee ihosta kuivaa, vaan itseasiassa juurikin sen vastakohtaa, mutta jotenkin se kuitenkin pitää ihon mattana pidempään. Voit käyttää tätä tekniikkaa myös koko kasvoilla tai levittää muille alueille puuterin puuterisiveltimellä. Salaisuus on lisätä pieniä määriä puuteria iholle, ihoon painavin kevyin liikkein!
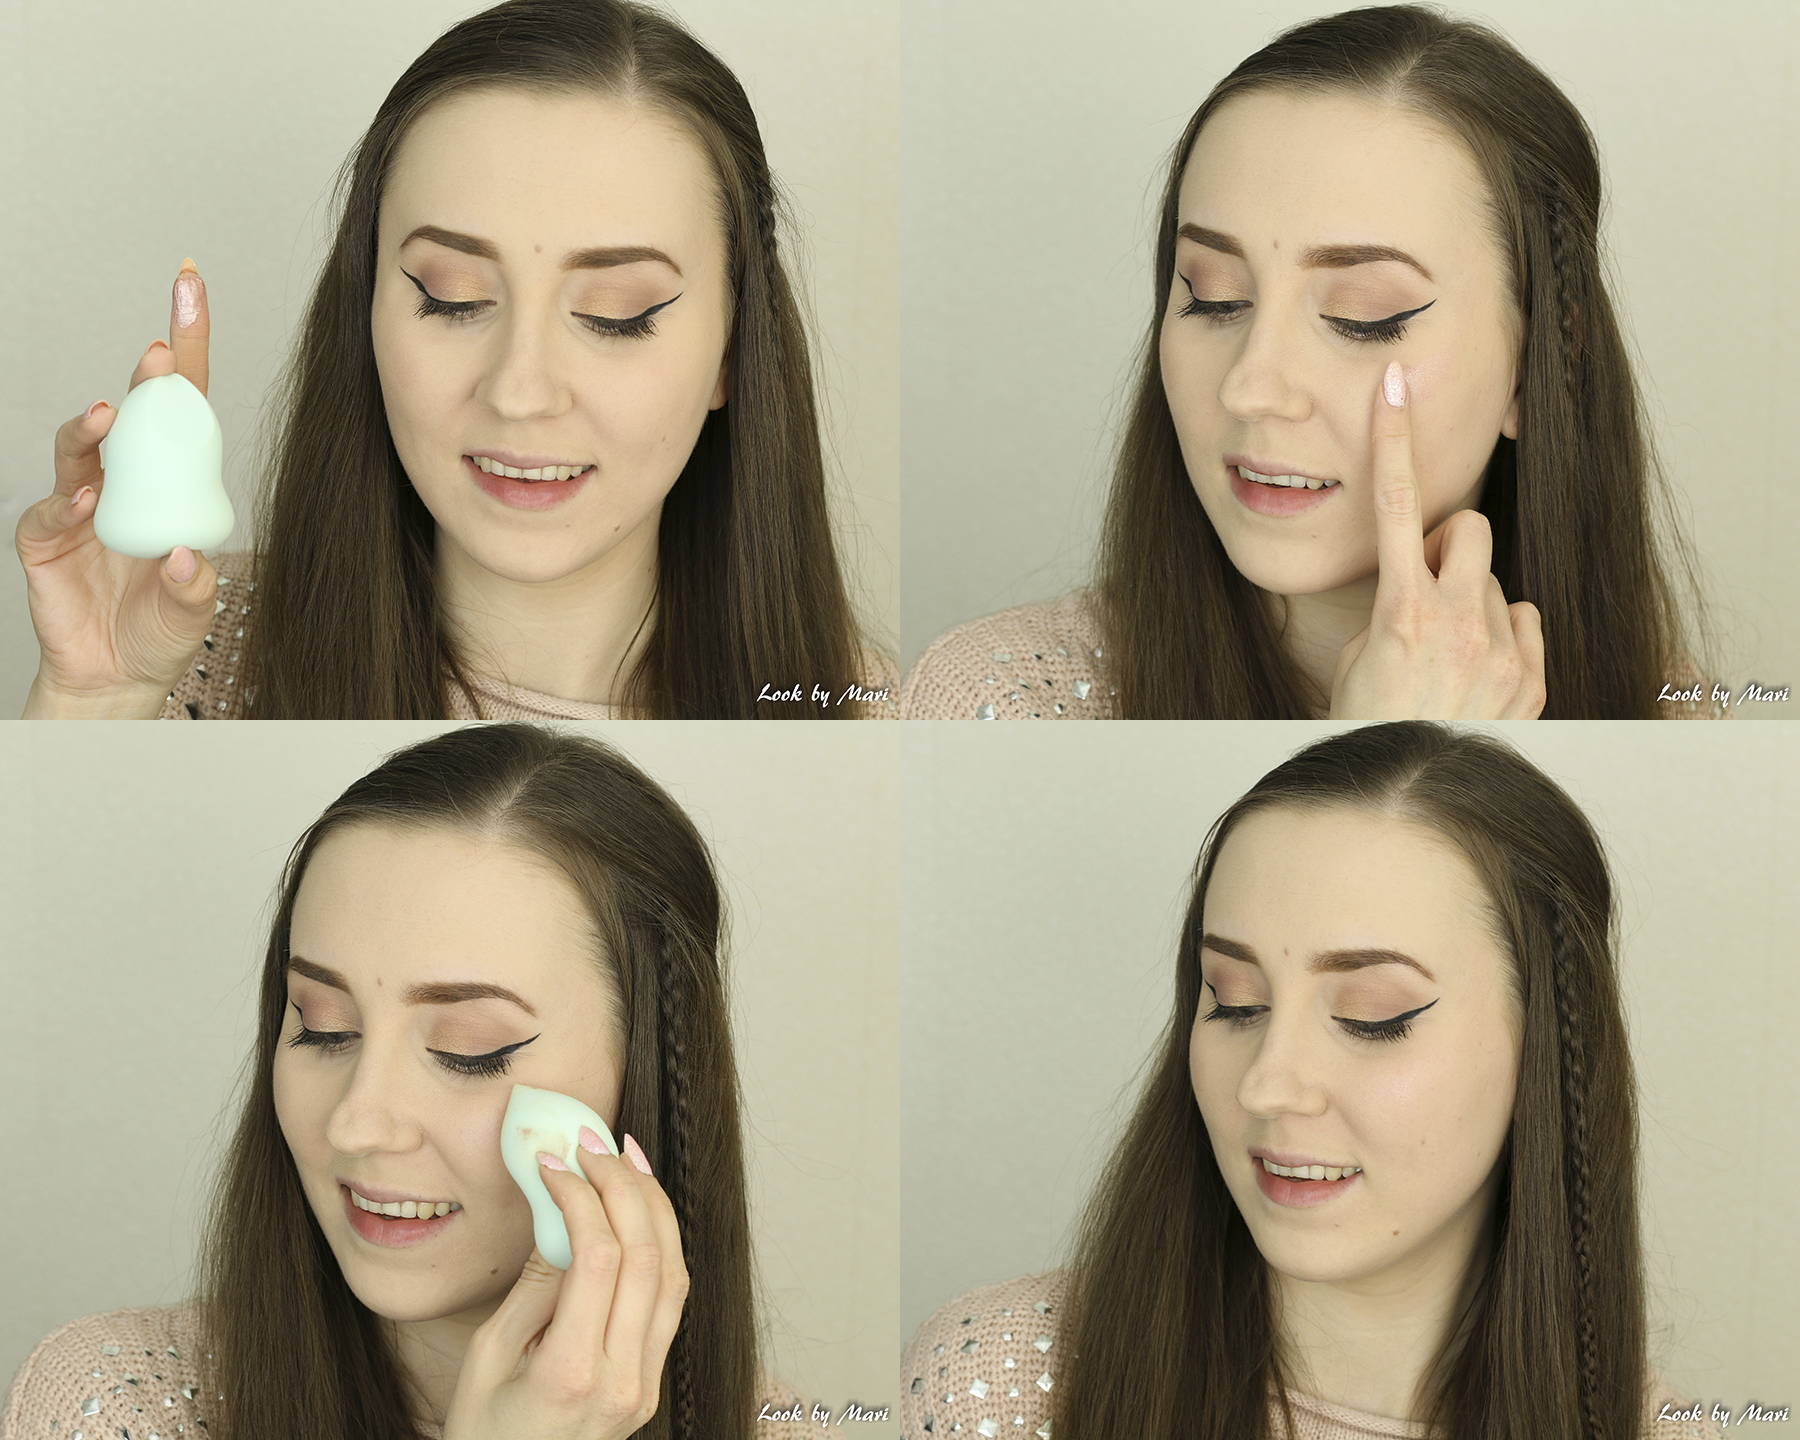
Next thing that you can do with a beauty sponge is adding cream or liquid highlighter onto your face. In this case you don’t want to powder the part of your face first, where you’re putting the cream. So on those parts skip that part after the foundation and add cream/liquid highlighter with your finger on top of the parts you want to be highlighted on. Then blend it with a beauty sponge and tapping motions. You can of course do it with your finger too, but a little bit dampen beauty sponge will give you a smoother and more even finish :) Sometimes when I want a healthy glowing skin on a foundation-free day, I even do this step on my bare face and it looks stunning!
Seuraava asia, jonka voit tehdä meikkisienellä on nestemäisen korostussävyn levitys. Jos haluat kokeilla tätä tapaa niin älä edellisessä kohdassa puuteroi ihoa niiltä kohdilta, johon haluat laittaa nestemäistä korostussävyä. Taputtele nestemäistä highlighteria sormellasi poskiesi korkeimpiin kohtiin ja häivytä meikkisienellä taputtelemalla. Tämän koko vaiheen voi toki tehdä pelkästään sormillakin, mutta meikkisientä käyttämällä lopputuloksesta tulee tasaisempi :) Joskus kun haluan meikkivoide-vapaana päivänä iholleni kauniin luontaisen hehkun, käytän tätä tekniikkaa, jopa paljaalle iholle. Ja kyllä näyttää kauniilta!
Then you want to set that cream/liquid highlighter with a powder highlight, if you want it to stay on all day long :) I used a settle highlighter and Real Techniques setting brush, which is my favorite highlighting brush!
Jos haluat korostussävysi kestävän häikäisevänä koko päivän, suosittelen kiinnittämään sen vielä puuterimaisella korostussävyllä :) Näin tuo hehku kestää iholla kauemmin ja halutessasi saat näin myös korostuksestasi näyttävämmän. Käytin tässä luonnollisempaa korostussävyä ja lemppari korostussivellintäni eli Real Techniquesin setting brush sivellintä!
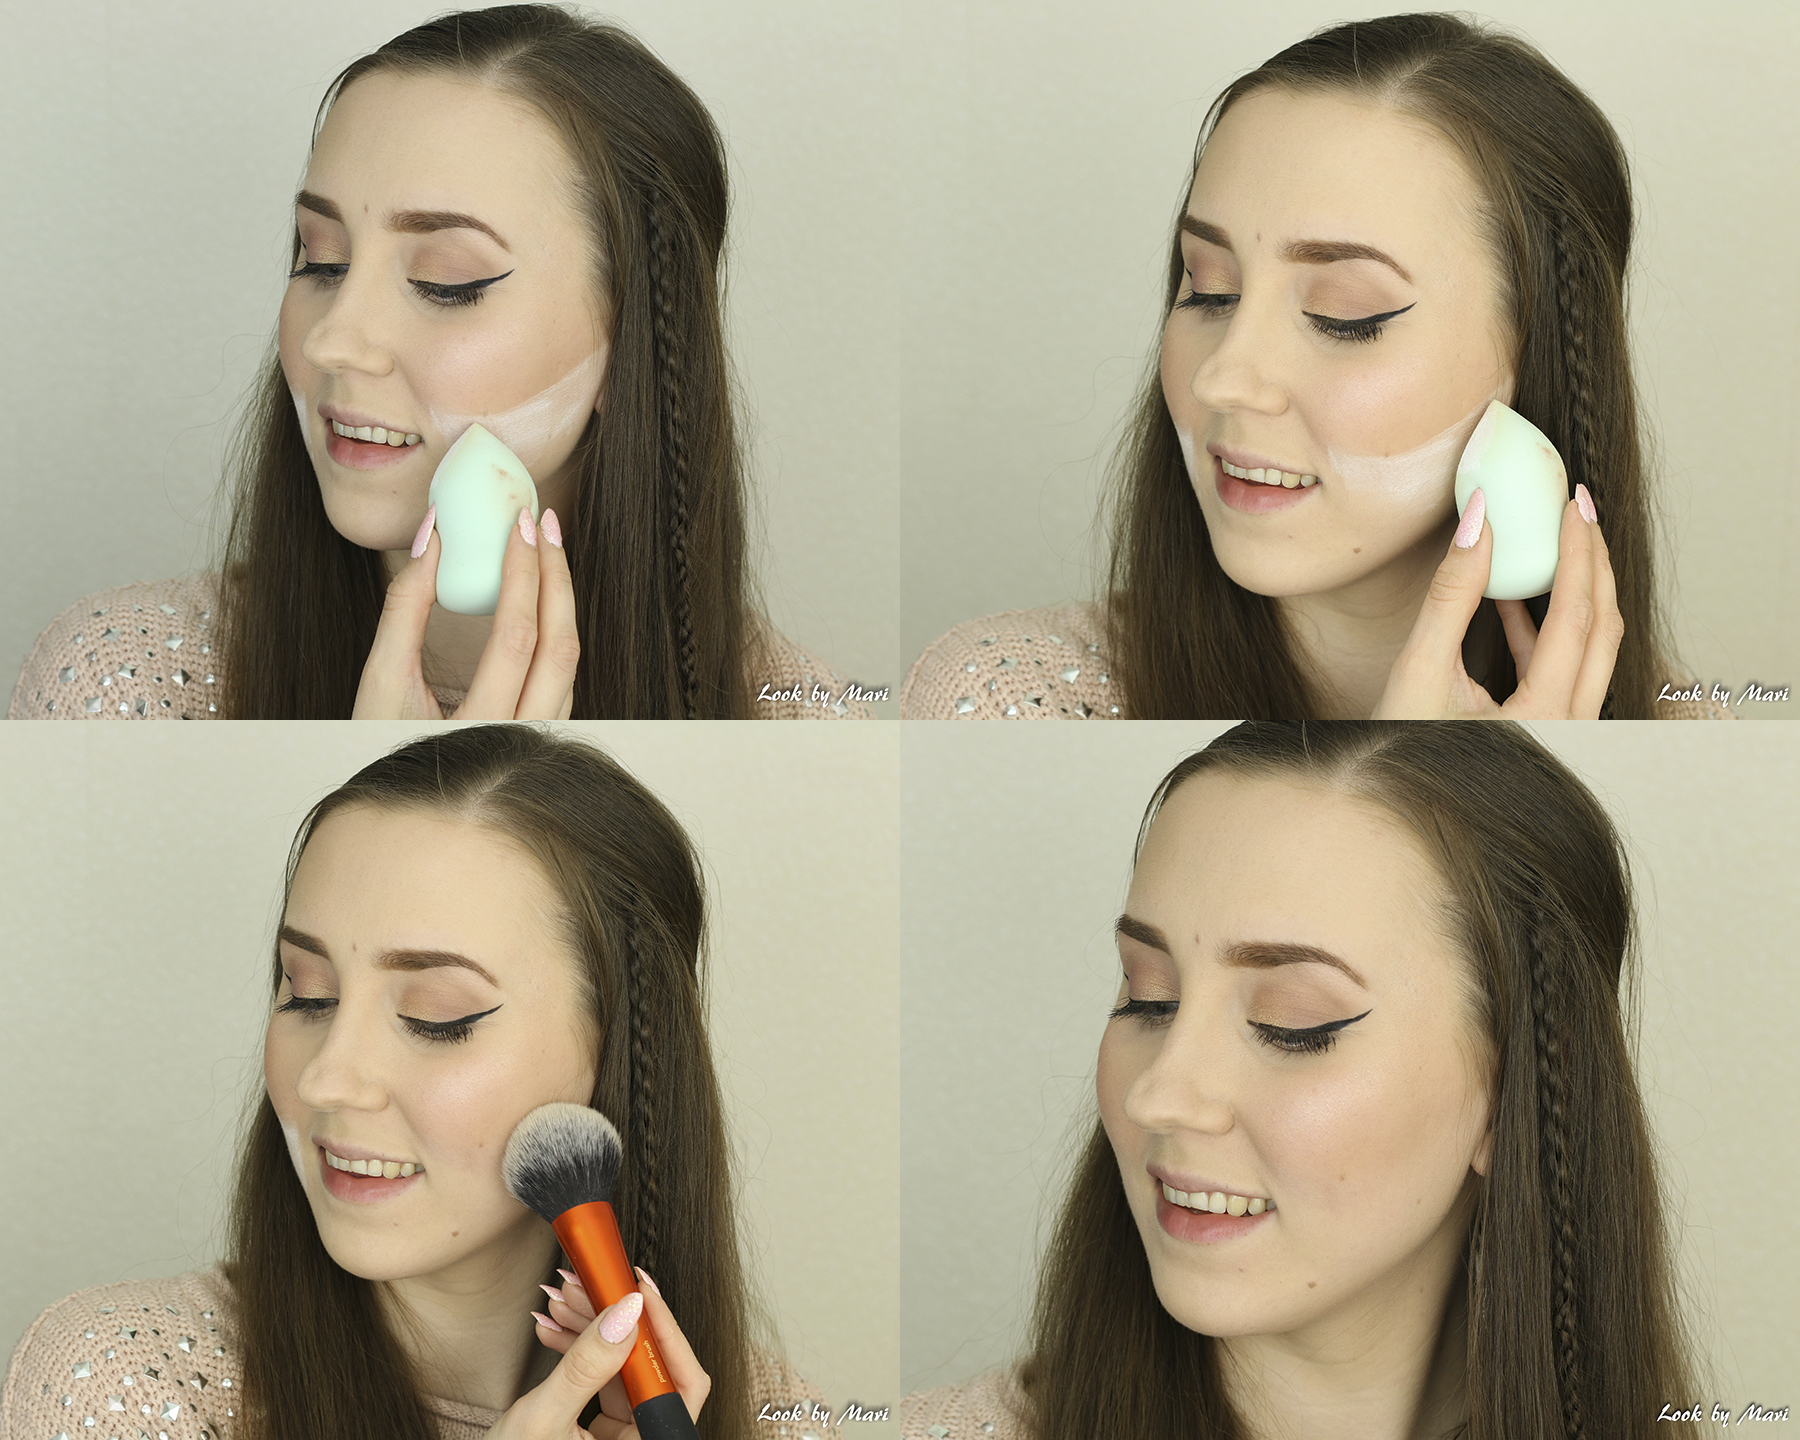
Then lastly what you can do with a beauty sponge is to clean up under your contour/bronzer to make it look sharp. I only do this when I’m doing a full glam party makeup, because other times I just want an all over bronze, which doesn’t need this added step. But when I’m doing this step, I dip my beauty sponge into the powder and drag it below my contour. Then I let it sit there for couple of minutes and just wipe it away with a fluffy powder brush. In these pictures it may not seem to do such a difference, but in real life it sure does! :)
You can of course blend your cream blush and contour with a beauty sponge too, but I prefer to do it with a brush, so that’s why I didn’t include those in here. These five ways are the ones I use all the time on myself and the first three I use every single time I do my makeup :) So those were the ways I use my beauty sponges and now let’s get into the reviewing part!
Viimeinen asia, johon käytän meikkisientä, on varjostusten terävöittäminen. Käytän tätä tekniikkaa vain, jos teen kunnon juhlameikkiä ja haluan varjostukseni olevan oikein tarkat. Muuten useasti vain levitän aurinkopuuteria ympäri kasvojen reunoja. Mutta kun haluan rajoista selvät, kastan meikkisienen puuteriin, vedän puuterilla rajan varjostusten alle ja annan sen olla siinä muutaman minuutin ajan. Sitten vaan pyyhkäisen ylimääräisen puuterin pois puuterisiveltimellä. Näissä kuvissa tuo ero ei näytä päätä huimaavalta, mutta luonnossa se on kyllä huima! :)
Meikkisienellä voi toki häivytellä voidemaisia poskipunia ja varjostuksia, mutta itse tykkään häivytellä ne siveltimellä, joten siksi en sisällyttänyt niitä tähän. Nämä viisi tapaa ovat kuitenkin sellaisia, joita käytän jatkuvasti ja varsinkin nuo ensimmäiset kolme ovat käytössäni joka ikisellä meikkaus kerralla :) Joten siinä olivat tosiaan nuo erilaiset jutut, johon käytän meikkisieniä ja nyt mennäänpäs siihen meikkisienten arviointi osaan!

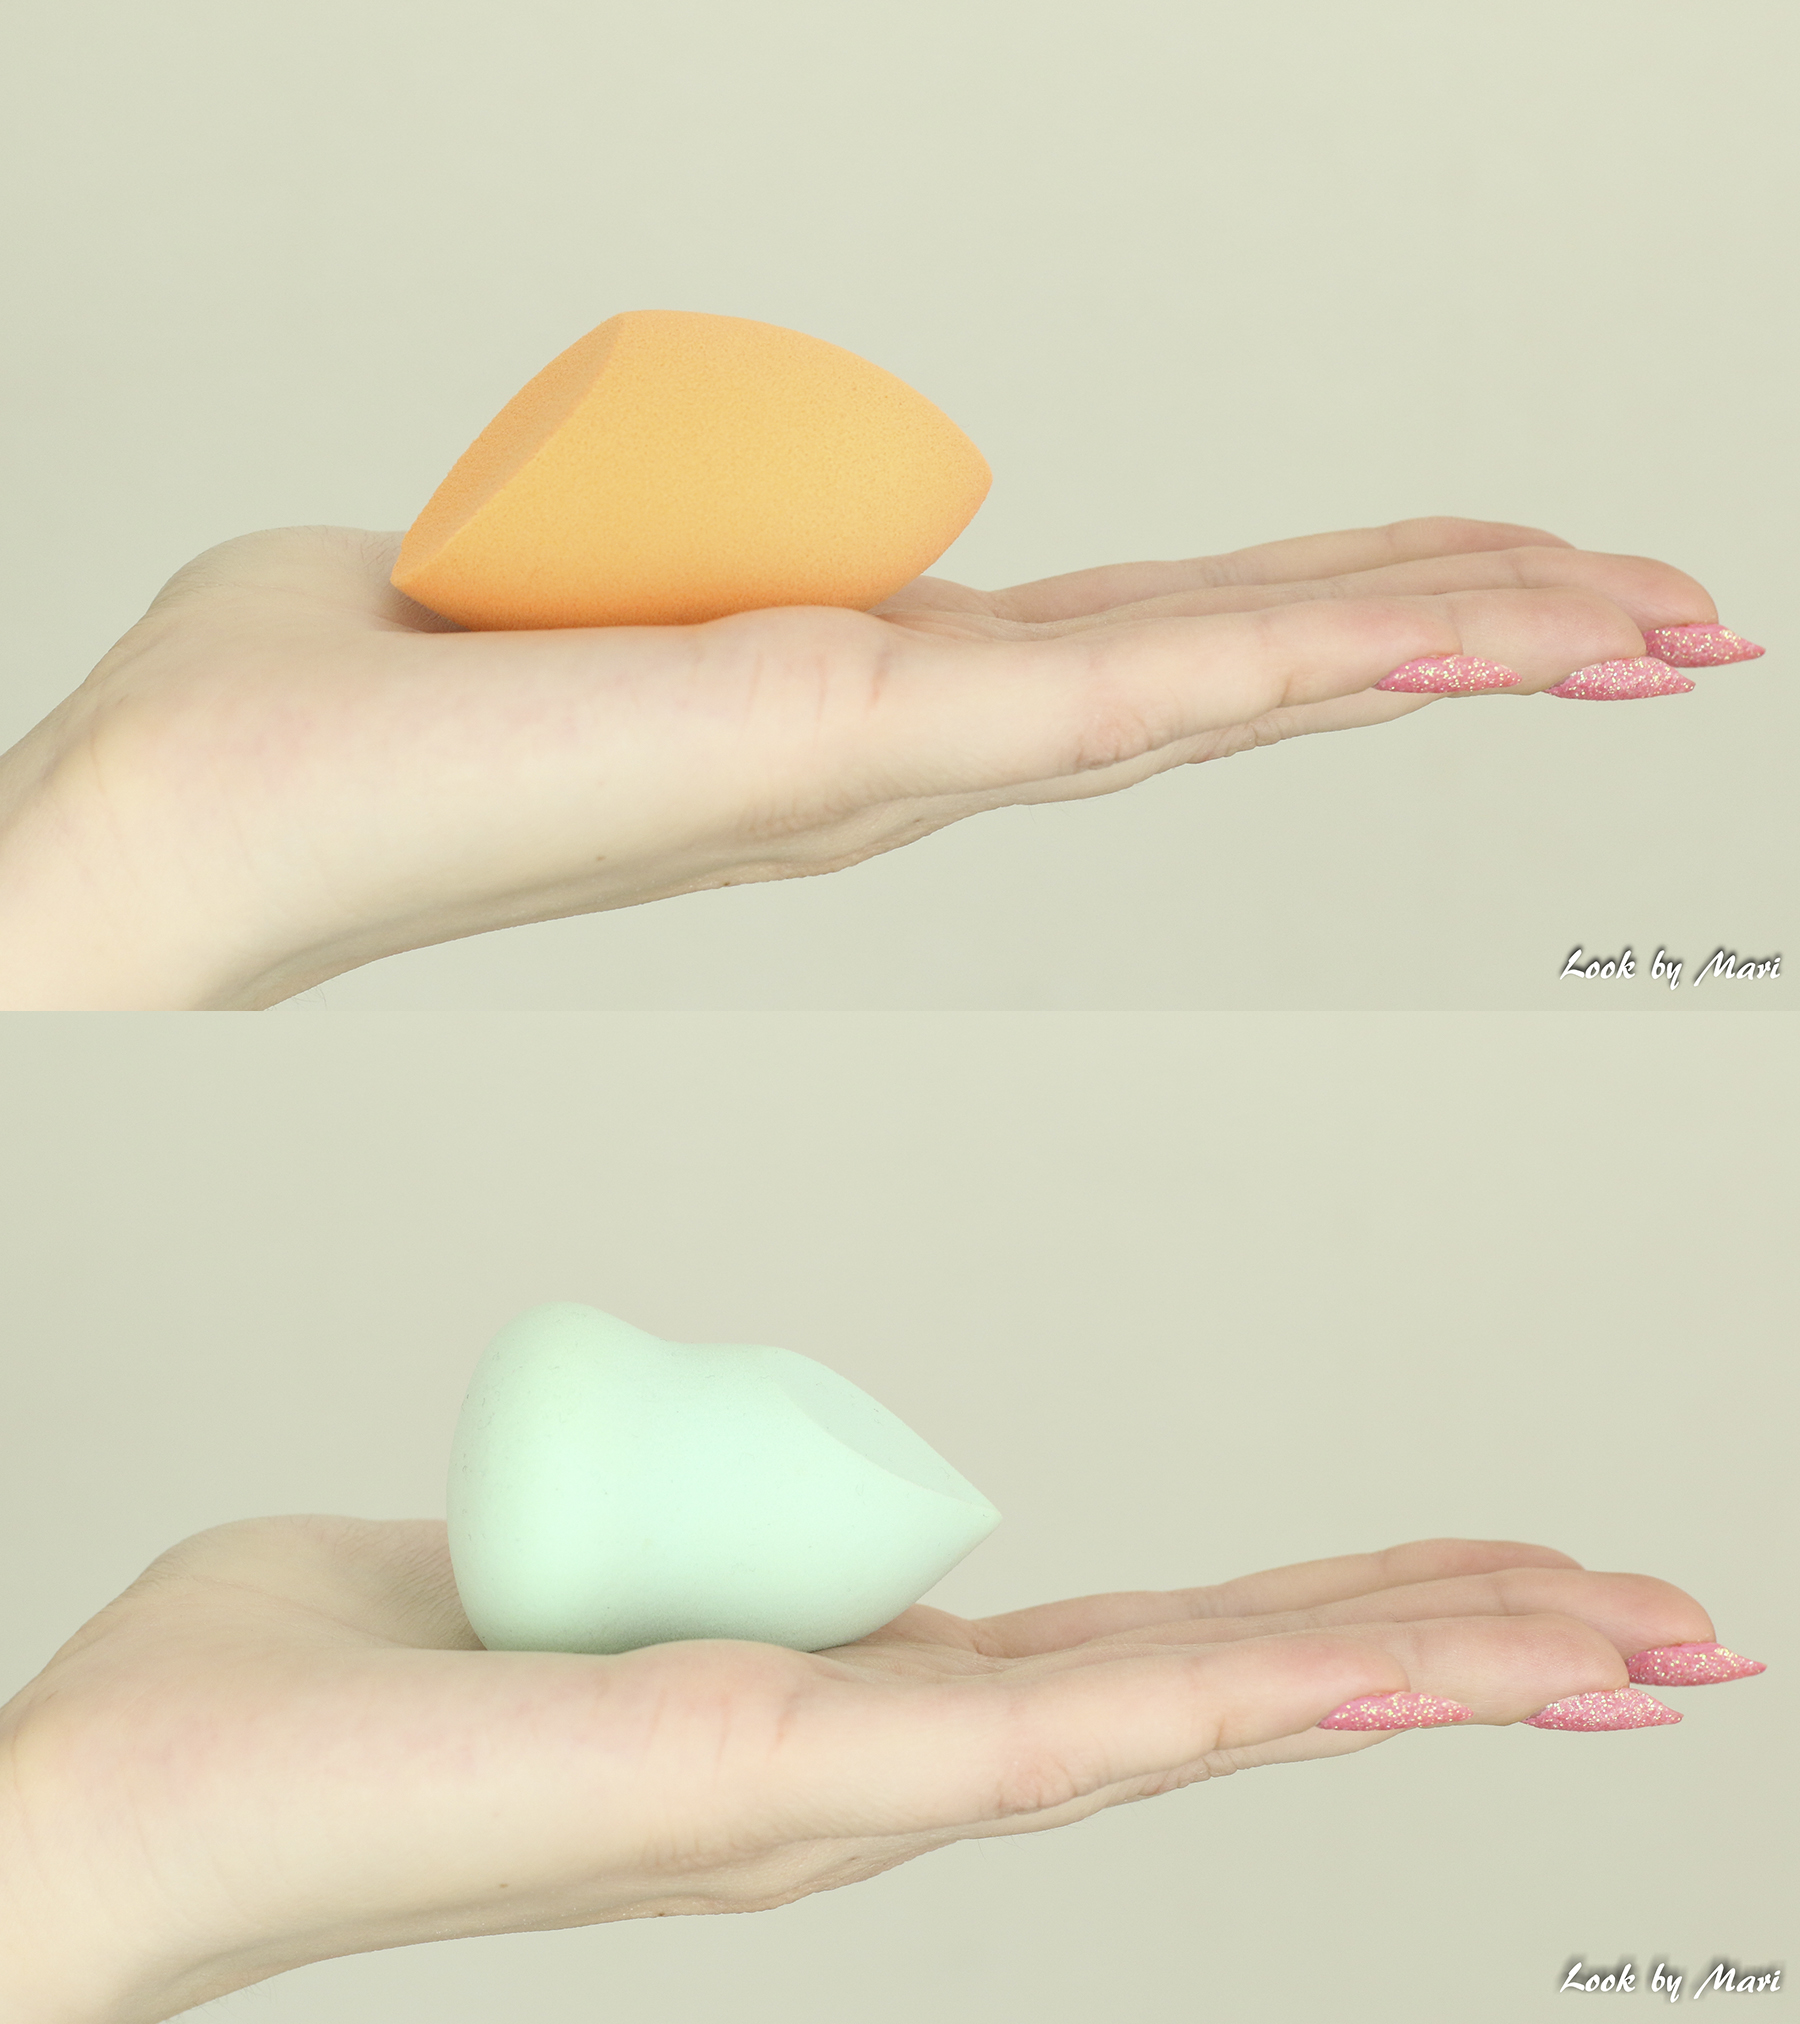

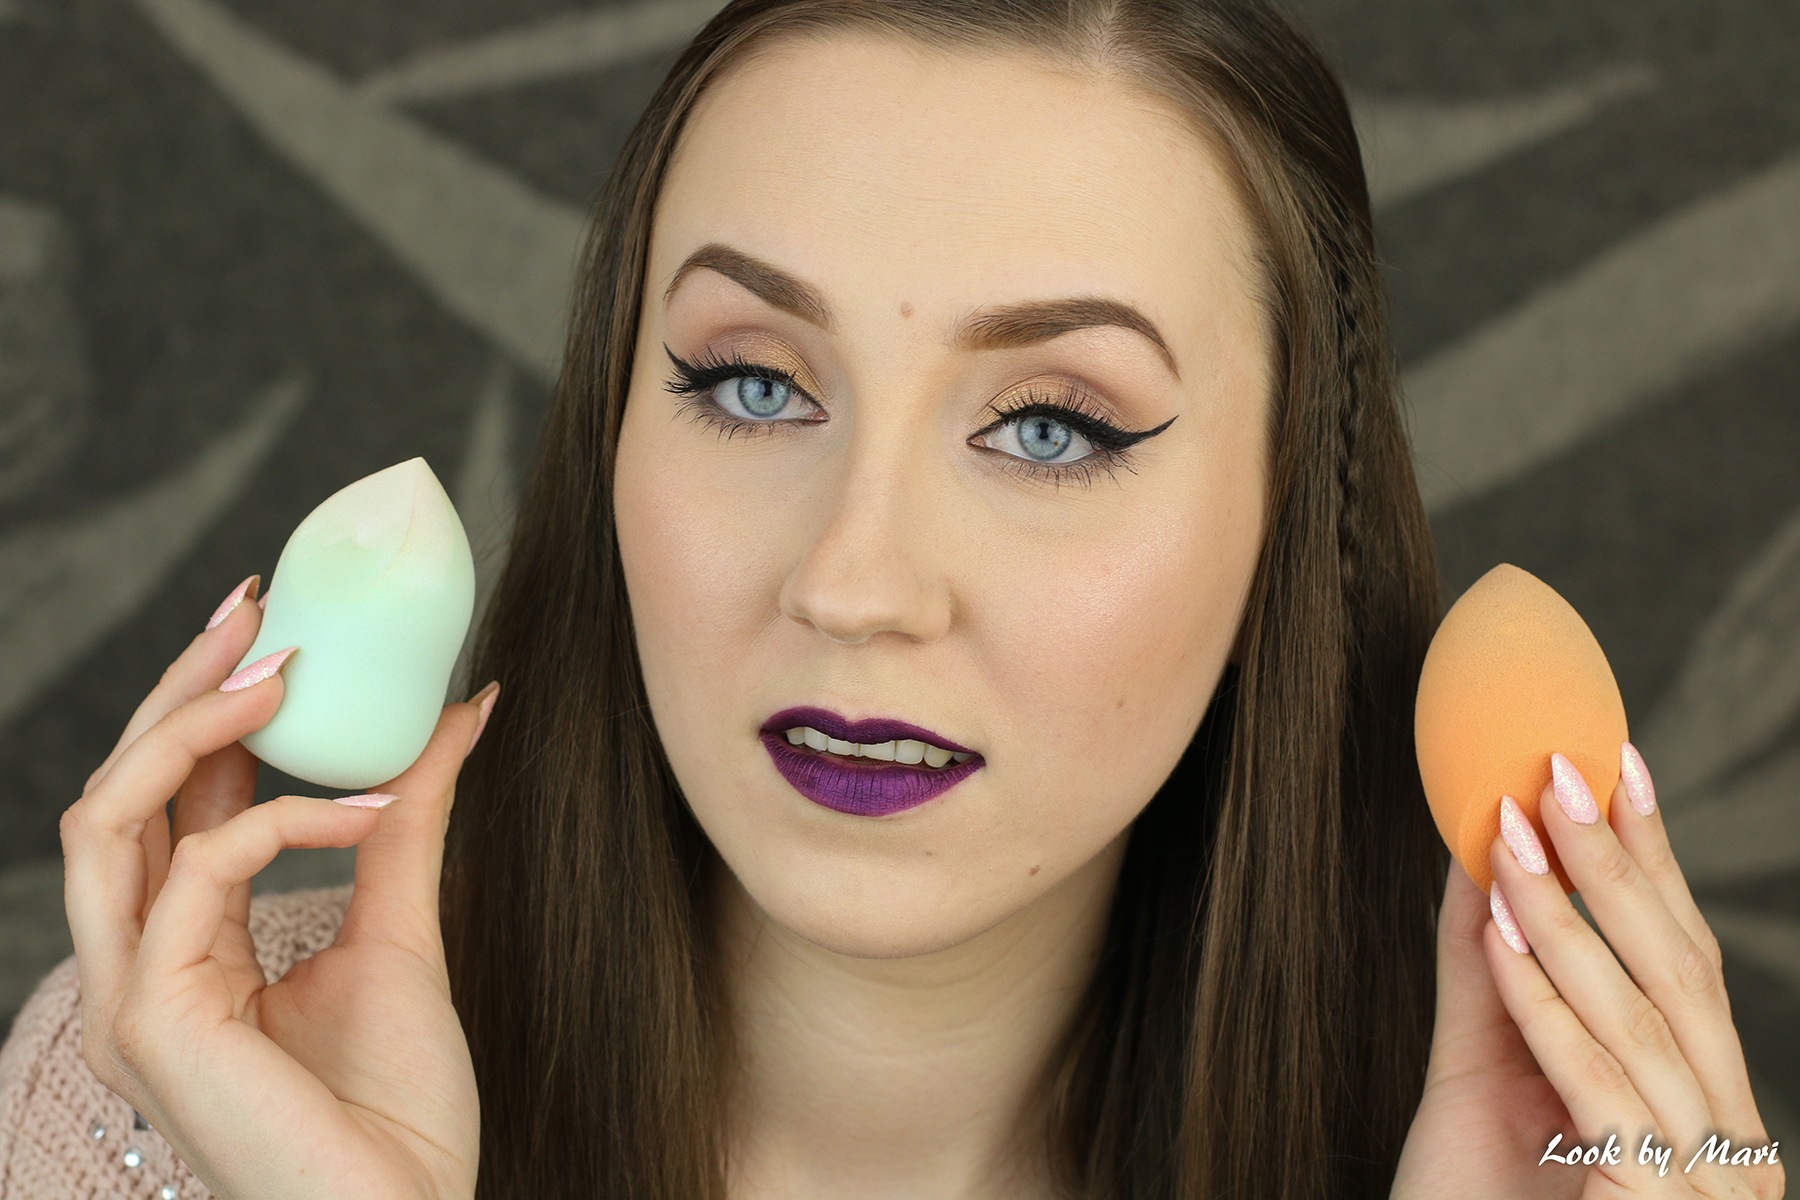
Like you can see, these two are kind of similar, but kind of totally different too in shape wise. What I like about the Real Techniques miracle complexion sponge’s shape is that it has a pointed tip, which helps getting under the eyes to blend out the concealer better. I also like the long rounded side to smooth out my foundation and I also like the carved bottom to clean up my contour. The sponge itself it’s quite bouncy and good material. This can be used with foundation and it doesn’t steal the coverage like some sponges tend to do. This also performs well with concealers, powders and with cream/liquid highlighters. I like this almost as much, if not even as much as I like the original beautyblender. Only a little bit worse part of the sponge is that the tip is lot bigger and not that pointed in Real Techniques sponge.
What comes to the Nanshy’s marvel blender sponge is that I like its tapered tip which gets under the eyes lot better than the RT’s sponge’s one. The flat side is also great for cleaning up under the contour. But what I don’t like about this is that it doesn’t go that well with foundations! This temps to steel the foundation’s coverage and soak up the product. I don’t get that with concealers, but with foundations, I don’t like this sponge :( This is great for concealers, powders and cream/liquid highlighters, but with foundations it doesn’t work. It tends to soak up all the foundation, instead of blending it.
Kuten näet tuosta kuvasta, ovat nämä kaksi muodoltaan toisaaltaan hyvin samanlaisia, mutta toisaaltaan aivan erilaisia. Real Techniquesin meikkisienen muodosta tykkään siitä, että siinä on suippopää, joka helpottaa silmien alla olevan peiteaineen levittämistä. Tykkään myös tuosta pitkästä pyöristetystä sivusta meikkivoiteen häivyttelyyn ja tuosta tasaisesta pohjasta varjostusten terävöittämiseen. Tämä meikkisieni itsessään on tosi joustava, hyvin kasaan puristuva ja hyvää materiaalia. Tämä soveltuu käytettäväksi myös meikkivoiteen kanssa ja se ei vie meikkivoiteelta pois peittävyyttä niin kuin jotkut sienet tuppaavat tekemään. Tämä toimii mahtavasti myös peiteaineiden, puutereiden ja nestemäisten korostussävyjen kanssa. Tykkään tästä melkein yhtä paljon, jos en jopa yhtä paljon kuin alkuperäisestä beautyblenderistä. Yksi seikka joka on vain tuota alkuperäistä huonompi, on tuo vähemmän suippo pää.
Nanshyn marvel blender meikkisienen muodossa tykkään taas sen todella suiposta päästä, jolla pääsee silmien alle vielä paremmin kuin RT:n sienellä. Tasainen osa on myös erittäin kätevä varjostusten terävöittämiseen, mutta en tykkää tästä meikkivoiteen häivyttämiseen, koska tämä imee itseensä liikaa meikkivoidetta ja varastaa meikkivoiteelta peittävyyttä. Eli tämä ei mene yhteen meikkivoiteiden kanssa! Tämä toimii hyvin kyllä peiteaineiden, puutereiden ja nestemäisten korostustuotteiden kanssa, mutta meikkivoiteen kanssa en tykkää tästä :( Tämä sieni vaan imee meikkivoidetta itseensä, sen levittämisen sijaan.
So if I would have to pick one of these two, I would choose the Real Techniques miracle complexion sponge, because it can be use with foundation too! And if you’re a beautyblender lover, I would recommend trying this out too, because it’s a great dupe for the original and it’s also half the price of a beautyblender! <3
Jos mun tarvitsisi valita näistä kahdesta toinen, niin menisit tuolla Real Techniquesin miracle complexion sponge meikkisienellä, koska se sopii myös meikkivoiteen häivyttelyyn! Jos muuten olet original beautyblenderin vannoutunut käyttäjä, suosittelisin vaihteeksi testaamaan myös tätä, koska tämä on todella mahtava meikkisieni vaihtoehto tuolle alkuperäiselle. Ja vielä alle puoleen hintaan beautyblenderiin verrattuna! <3
So like I said, I got both of these from pastelbeauty.fi and these are sold in their website :) By the way I did a Real Techniques vs. Nanshy makeup brushes post a while back, if you’re interested to hear more about these two brands’ products! But hopefully you learned something new along the way and till next time, bye bye :) – Mari
Kuten aiemmin mainitsin, sain nämä molemmat pastelbeauty.fistä ja näitä tosiaan löytyy sieltä myynnistä :) Muuten, tein aiemmin Real Techniques vs. Nanshy meikkisiveltimet postauksen, jos sua kiinnostaa kuulla enemmän näiden kahden merkin tuotteista! Toivottavasti opit jotain uutta matkan varrelta ja aina seuraavaan kertaan asti, moikka :) – Mari
Kiitos kun kerrot asiat ja tavat yksityiskohtaisesti. Pysyy maallikkokin kärryillä. Kiitos käytännöllisistä kuvista😊 sun violetti huulipuna on turhan erikoinen.
Voi kiitos Teija! Koitan toteuttaa näitä tutoriaaleja niin, että ne ovat hyvin selkeitä eli hyvä sitten että on sun mielestä ollut selkeä :) Kiitos kun kommentoit! <3 - Mari
Toi RT:n sieni on mun ihan staple-kamaa :P
Blogissani on muuten sulle haaste, käy kurkkimassa!
http://huulipunamania.blogspot.fi/2017/04/the-best-of-skincare-haaste.html
Moikka Idsu! Se on tosi hyvä eli en ihmettele :) <3 Ja ooh mähän käyn kurkkaamassa! - Mari
Kiitos vinkeistä! En kyllä vaihtaisi beautyblenderiä enää mihinkään, se on mullistanut meikkivoiteen ja peiteaineen levityksen itellä. :)
Charlotta x http://charlottaeve.com
Moikka Charlotta! Ole hyvä vain :) Toivottavasti löysit uusia hyviä tapoja käyttää beautyblenderiäsi! – Mari